1st November this year fell on a Tuesday. I could have made a bridge for a longer “weekend”, but could not due to my workload at work 😦
I was glad to break off work for that one day that week for a yearly family reunion, hosted by one of my SIL’s. While driving to my SIL’s, we stopped at a friend’s house. I received a text message from F that she was giving away some of her ‘harvests’ in her garden.
Guess what? I hand-picked the chillies in her garden. They were so, very, very fresh! She wanted only the red ones, so I helped myself to the green chillies. I didn’t mind the ‘raw version’ at all, because I knew if I left the chillies wrapped in absorbent paper in the lower drawer of the fridge, the chillies would ripen.
And I was right!
10 days later, some of the birds’ eye chillies had turned to a lovely bright orange-crimson colour. And I knew exactly where some of the chillies would end up into 😉
Thai Chef vs Me
There was one Wednesday that I took a day off and brought my 2 sons out for lunch (Note, both boys had half-day school / Univ on a Wednesday). We went to a Thai resto near our place.
For starter, I ordered Tom Yum Goong (TYG) for us. It was a good TYG, but I missed that Oomph in their soup. It was a wee bit too lame.
Saturday came, and TYG was in the pipeline for our lunch menu.
So here it was, my version vs the Thai Chef’s.
And not only that, I made my TYG in my thermomix!
To be honest, I could eat my TYG all day without anything else that day, because it had been a while since I last made the soup! I looked back at a post I wrote; it was in March this year when I had friends over. You can read it all … Here 🙂
Because I love bold-tasting soups, I thought of a way to totally infuse the aromatics in the soup first before proceeding further. Be warned! It’s a highly seasoned soup that hits the palate and warms the heart without burning, if you know what I meant 😉
(Note: This is my own recipe using my preferred method – tried and tested – after a few trials and errors).
Please be aware that some measurements are not given as only you will know how much or how little you want to put in the dish. Remember, “Utquod ali cibus est aliis fuat acre venenum” or what is food for one man may be bitter poison to others.
Ingredients A
2 cm piece galangal
1 shallot
1 lemongrass
2 coriander roots
Ingredient B
5 g cooking oil / coconut oil
Ingredient C
1,500 g water
Ingredients D
Lemongrass, bruised and halved
Shallots, halved
Galangal, sliced
Bird’s eye chillies, lightly bruised
Kaffir lime leaves, lightly bruised with the fingers
Ingredients E
Fish sauce, to taste
Homemade chilli paste, eyeball for colour, taste and flavour
Salt, to taste
Ingredients F
Prawns, shelled
Mushrooms, sliced
Ingredient G
Lime juice, to taste
Cherry tomatoes, halved or whole
Ingredient H
Fresh coriander
Steps –
Place A in the TM bowl. Grind 5sec/ sp 10 * 2
Add B. Sauté for 3 mins/100C/ sp 2
Place D in SB and add C. Cook for 15 mins/ 120C/ sp1
Remove the SB and tip the aromatics in a bowl. Set aside for garnish later.
Transfer F in the SB. Cook for 4 mins/120C/ sp 1 or until the prawns are cooked.
Remove the SB and set aside the cooked prawns, mushrooms, etc
Add E. Cook further for 5 mins/ 120C/ sp 2
Add G. Stir for 1 min/ R/ spoon.
Assemble a serving bowl with prawns, mushrooms, cherry tomatoes, some slices of galangal, bird’s eye chillies, lemongrass and kaffir lime leaves. Garnish with H.
Done!
Happy 1st Anniversary!
I made the TYG to go with my Nasi Ulam and baked spiced chicken. Our Saturday lunch was the bomb, by the way, with full-blown explosion of flavours. Yup, my kind of food 🙂
There’s no better way to celebrate my first year anniversary of owning the thermomix than sharing with you some of the dishes I have conjured the past 12 months using my most used kitchen gadget today!
And as they say, ‘A picture is worth a thousand words‘ …
IMPORTANT NOTICE : Please be aware that I’m neither a Consultant/ Advisor nor an employee of Thermomix. I am NOT paid anything from any parties. I just happened to own a thermomix and love doing what I’m doing and will continue doing so.
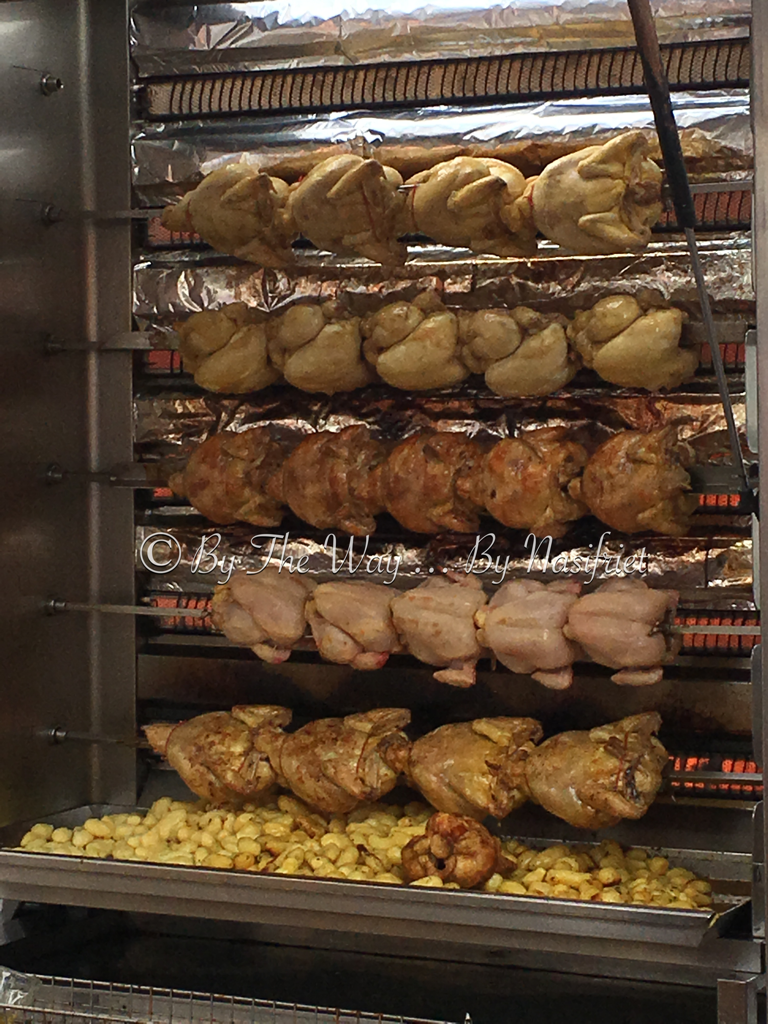
The rotisserie whole chickens looked so tempting. Every Wednesday evening while driving home from work, I would drive past the mobile food truck on the N2 road from Brussels to Leuven.
I could smell the roasted chicken smoke whiffing past my nostrils through the vents of my car somewhere! It’s oh so tempting.
I just had to stop.
So one Wednesday evening, I stopped and walked towards the food truck.
There was only one guy manning the truck that evening. I pointed to the chicken I wanted and some baked potatoes. The guy then packed the roasted bird in a microwaveable paper bag, and a separate bag for the potatoes.
I was pretty certain my guys at home would be beaming with delight from what I had just bought.
BUT … Most unfortunately what you see is not what you get! The chicken was juiceless and shrivelled when I carved the meat. No doubt it was cooked through, but the taste was rather bland. I suspected only salt, pepper and paprika powder were used to season the chicken. To add salt to injury, the potatoes were swimming in buckets of dripping! Urgh!
Hubby had his last words, “Don’t buy this chicken any more!”
I Did It My Way …!
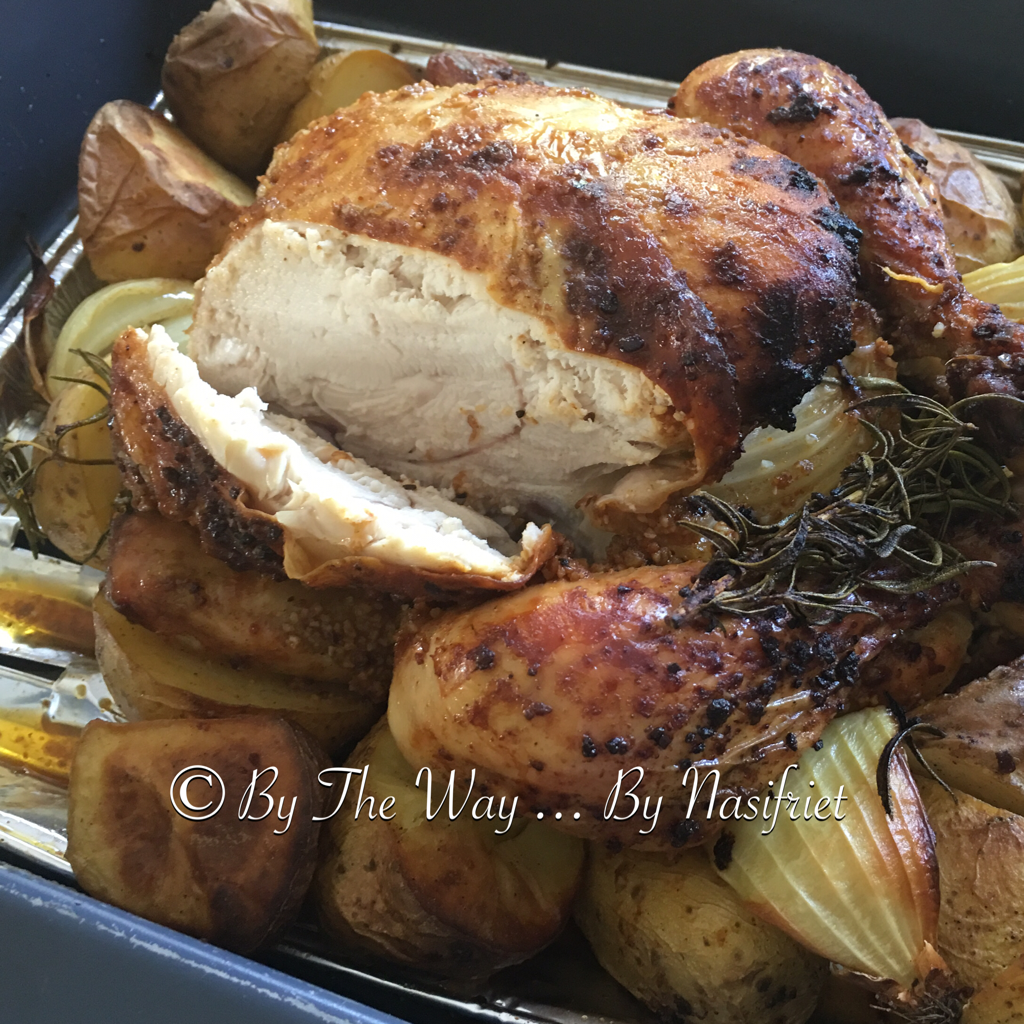
Okay, I did not buy the rotisserie whole chicken anymore from the food truck, but we have had some form of rotisserie whole chicken at home, done my way *big smile*
Oh by the way, I had been fiddling with the flavours of the chicken and I have found the right one, me thinks!
I oven-baked this whole chicken last Sunday and my family of 4 finished the entire bird and licked our platters clean!
This simple lunch was a keeper. It was hassle-free. While waiting for the chicken and potatoes to cook in the oven, I prepared a simple and quick salad. I had the most idle Sunday ever. Yay!
Eureka!
Here’s how I did it.
First of all, pre-heat the oven at 190 degrees Celsius.
Rinse and pat dry 1 whole chicken weighing at least 1.5kg. Set the chicken aside to room temperature for at least half an hour.
In a clean bowl, mix together your favourite dry herbs and spices, sea salt and freshly-milled black pepper. The choice is endless, so don’t be shy. Stir well to combine.
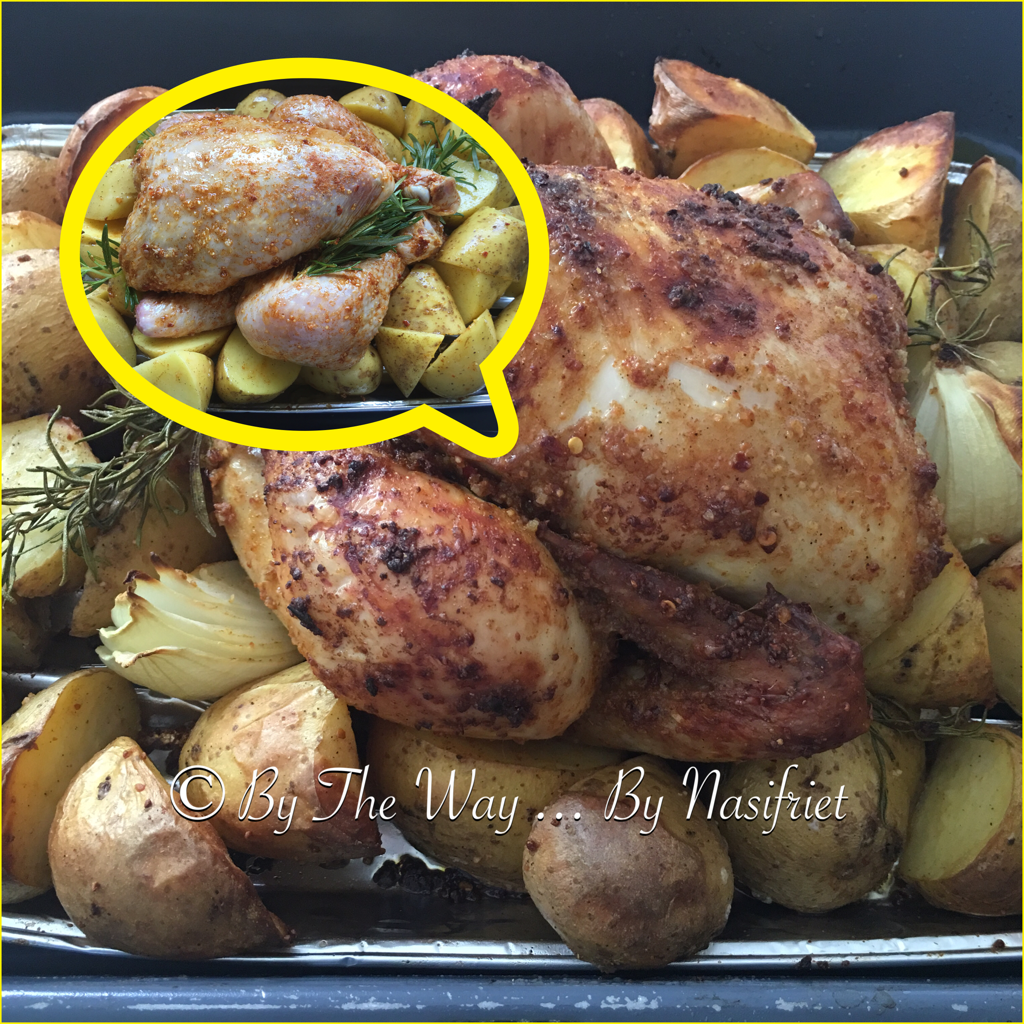
Meanwhile, stuff the cavity of the chicken with 4 cloves garlic, 1 lemon or lime (halved), 1 onion (quartered), a few slices of ginger and fresh rosemary. Tie the legs together and tuck the wings under the chicken. This is the trick to keep the chicken sappy AND tasty from inception to end. *wink*
Next, drizzle some olive oil over the chicken and transfer the homemade rub mixture all over the chicken. Then comes the most therapeutic part … massage the chicken thoroughly with the rub mixture making sure every nook and cranny of the bird is being swaddled completely.
Finally, transfer the chicken, breast-side up onto a baking tray, lined with (olive) oiled and seasoned potatoes and/ or root vegetables, onions, garlics and fresh rosemary.
Bake the chicken for 1 hour 30 minutes in the pre-heated oven at 190 deg C. Remove the chicken from the oven and let it rest for at least 15 minutes before carving.
The chicken may look dry at the first instant, but trust me, the meat is cooked through perfectly and is as juicy and succulent as ever!
By the way, I have oven-baked whole chicken a few times already. I discovered that baking at the right temperature and timing are paramount execution in getting the best equilibrium. Believe you me, I have had a few charred experiences. It was only by several trials and errors that I can finally say, Eureka!
My Verdict?
Well, I will definitely not buy the rotisserie chicken from the food truck anymore, that’s for sure!
What can I say, nothing beats homemade cooking any day, any time. Simple as that!
A word of caution though, this foolproof baking is in accordance to the type of oven I own. You may have a different oven than mine, hence, the temperature and timing may or may not differ. And I did mention that it was by several trials and errors that I finally got the bird cooked right, my way *wink*
Last Summer my family made a trip to Kuching; a very much delayed trip of 7 years’ overdue. While I was in 7th heaven binging foods I grew up eating, my Belgian hubs and Belsian boys were craving for their Belgian fries. Erm… I guess I could totally understand their cravings, because that’s what happened to me this Summer!
We were in the South of France for 2 weeks, consuming local Provençal’s 3-course meals almost daily. And guess what? My palate was screaming for SPICES!!!
When we headed home, I was longing for that one dish that’s packed with spices and fresh herbs. Because I had been “pampered” with served meals while in the Provence, it was hard getting back to cooking mode. By the way, I have not been using my thermomix for almost a month! Tsk! Tsk! Tsk!
Therefore, one weekend, I moved my thermie and placed it under the extractor hood. My mission? To appease my craving. Yup, I was craving for the Indonesian inspired dish, “soto ayam” because that’s one tantalising dish that’s packed with all the goodness of spices and fresh herbs. No ready-made or instant boemboes! Everything was fresh and cooked from scratch… in my thermie!
If you are wondering what “Soto” means, I was as blur as most of you, so I asked the right people, my Indonesian colleagues. They said it’s a soup dish. Yes, I knew it’s a soup dish, but what is soto? I did not get an answer right away but they went on to explain that usually chicken meat is submerged in water with specific spices and herbs to obtain the broth.
Okay, in my humble opinion, soto is not just a simple soup dish, it’s the methodhowthe broth is made. My Indonesian colleagues agreed to my curious conclusion.
And by the way, I used fresh turmeric to give the broth that vibrant yellow look, while poaching and simmering the chicken in the broth. It’s such a healthy dish, with lots of flavour and very, very aromatic.
Two years ago, I posted the soto ayam recipe done the conventional way, so in this post, I’m going the opposite direction.
The Revival
Since our Summer hols in August, my thermomix had been left idle for about a month! When I started cooking the soto ayam, my thermie went bonkers. The sound of the blades spinning was not normal. It sounded rusty. I was hoping the squeaky sound would go away. It did not, until I started to boil the chicken. Guess what?!!! My thermie stopped cooking completely in the first 4 to 5 minutes. And I still had so many more minutes to go before the raw chicken meat was cooked!! Oh no!!!! Not now. So I did what I had to do, i.e. removed the plug and then re-plugged. At the same time, I had to re-start the menu. I felt like a surgeon reviving a comatose. Thank goodness, the ‘flatline’ re-acted and my thermie came back to life! It was a HUGE relief! Phew!!!
And here’s how I cooked my Soto Ayam, which I have personally translated as Fragrant Herbed Chicken Soup, because that’s what it actually is!
Ingredients A
5g Sarawak white peppercorns
5g coriander seeds
Ingredients B
70g garlic
230g shallots
50g galangal
10g (1 stalk) lemongrass
25g turmeric
65g ginger
20g candle nuts
4 kaffir lime leaves
Ingredients C
60g coconut oil
Ingredients D
8 pcs (ca 1 kg) chicken drumsticks
800g water
4 stalks lemon grass (bruised)
A palmful kaffir lime leaves (bruised)
Coarse sea salt to taste
Ingredients E
8 – 9 medium-sized eggs placed in Varoma dish
Ingredients F
500g hot water
Garnishing
Cucumber, julienned
Fried shallots (not in photo)
Spring onion
Fresh coriander
Mint leaves
Method
Place A in TM bowl. Dry roast for 10 mins/ V/ sp 1. Mill the toasted spices when temp drops below 60C. Mill for 1 min/ sp 6->10/ MC
Tip the ground spices onto a clean plate/ bowl. Set aside
Meanwhile add B and blend for 15 sec/sp 10. Scrape the sides of the inner bowl and under the lid. Again, blend for 15 sec/ sp 10.
Add C and ground spices A and sauté for 15 mins/ V/ sp 1
Add D. Cook for 15 mins/V/R/ spoon
Place E on top of TM bowl and cook / boil further for 17 mins/ V/ R/ spoon (or until the eggs are boiled according to your liking or better still, use the TM5 recipe chip and boil the eggs separately. I like mine with firm white and runny yolk. Heaven! )
Remove Varoma dish and cool eggs under cold running water. Set aside.
Remove cooked chicken. Set aside
Meanwhile add F and check the seasoning of the broth. Boil further for 5 mins/ 100 C/ R/ spoon
Before drizzling the hot spiced broth, plate the sliced cooked chicken in a (deep) bowl and garnish with thinly stripped cucumber, coriander leaves, spring onions and mint leaves. Place a hard or medium or soft boiled egg on top and sprinkle with fried shallots/ onions.
Pour the hot broth slowly over the chicken.
Serve with steamed white basmati rice (which I also cooked in my thermie)
A Picture Is Worth A Thousand Words!
Sinfully yummy. One of the best comfort foods 🙂
Mmmmm….Simply gorgeous!
I served my soto ayam with steamed basmati rice.
My Verdict?
When my thermie stopped cooking in the first 5 minutes, I felt my whole world came crashing down around me! It was that bad. I was thinking that I had prepared everything for nothing. That’s just not me. I wanted to see, or better still, taste the end result. It appears that the thermie must not be left idle for a long time. It needs attention and wearing, therefore, TM owners, keep your thermie busy!
Now, the verdict for the dish. Usually I would serve the soto ayam with vermicelli or noodles. This was the first time I had the fragrant herbed chicken broth with steamed rice. It was a complete meal which we all liked, but personally, I would serve the broth with rice noodles. As you can see, the egg was supposed to be hard-boiled, but it turned out soft, which we all liked, too 😀
With the summer temperatures behind us, this dish will be made quite frequently now. This dish is pure comfort food for cold weather.
So I made this dish again with rice vermicelli, and making sure to boil the eggs separately as per the recipe chip.
The other savoury and crunchy snack which I LOVED and still do is Murukku. Murukku is the Tamil word for ‘twisted’ which appropriately described the shape of the snack, which is shaped in a spiked surface spiral form.
Making Murukku is not difficult at all if you have the right mould or Murukku or Chakli press. I did not have one until last Summer when I was in Kuching with my family. I made sure I bought all the necessary moulds which could not be found in BE. I did not buy a specific Murukku mould or press but more so, a multi purpose mould, which can be used to make string hoppers or putumayam or idiyappam. The mould can also be used to make cendol. It’s a plastic mould with 8 templates of different patterns. It’s not the best mould, but it’s light weight and easy to assemble and to clean…. and its’cheap. Only RM 14 or 3 Euros!
Chakli or Murukku?
I have not heard of the word Chakli while growing up, since Murukku, which is the Tamil word was popularly used in Kuching or Malaysia and Singapore, for that matter. By the way, there is a slight difference in the ingredients used for making Chakli vs Murukku. Chakli has rice flour and besan or chickpea or gram flour while Murukku has rice flour and urad or mung dhal.
Since I am more familiar with the word Murukku, and that there’s a twist in ingredients between Chakli and Murukku and the fact that I never deep-fry my foods in my kitchen, I christened this recipeas “Baked Twisted Murukku”
And guess what, I pulverised the organic dried chickpeas into chickpea flour in my thermie. That was the first step.
You could also make rice flour from soaked raw rice, but since I had a 1 kg bag of store-bought rice flour in my pantry, I wanted to finish that first.
The idea of baking the Murukku is adapated and improvised from Tarla Dalal’s recipe for Baked Chaklis which I have converted by using the Thermomix. Tarla Dalal used only rice flour, but I added freshly ground chickpea flour to the rice flour. And by the way, I like the idea of adding yoghurt instead of water to the dough mixture.
Ingredient A
100 g organic dried chickpeas
Ingredients B
100 g rice flour
130 g Greek yoghurt
10 g white sesame seeds
5 g whole jeera (cumin seeds)
5 g lovage seeds
1/4 tsp turmeric powder
5 g chilli powder
Sea salt to taste
1 tsp sunflower (or corn) oil
Ingredient C
1 tsp water (or eye-ball)
Method
Pre-heat the oven at 180 deg C.
Place A in TM bowl. Mill 1 min/ sp 10/ MC. Scrape the sides of the inner bowl and mill again for 30 sec/ sp 10/ MC. Scrape the sides of the inner bowl and the lid.
Add B. Mix for 1 min/ sp 2. Slowly add C and knead for 5 mins. Eye-ball for dough consistency, which should be a semi-soft dough.
Tip the dough onto a clean bowl and knead briefly. Put some dough mixture into a murukku press using the single star nozzle. Press and make swirls of 5 to 6 cm diameter murukku on a pizza crisper tray or a baking tray lined with silicone baking sheet.
Bake in a pre-heated oven at 180 deg C for 16 to 17 mins. Do not over-bake as the murukku will be charred bitter.
Cool and store the murukku in air-tight container.
My Verdict?
I LOVED it! The Murukku were super crispy. The flavours of the seeds – sesame, cumin and lovage transported me back to my childhood days. I felt the warmth in my tummy from the chilli flakes rather than in the mouth. It was a good feeling. The only drawback was, I was the only one eating the Murukku! My boys and hubby are not fans of the seeds. Sesame seeds were okay , but not the other Indian spices. Next time I will tweak the recipe and add ingredients that would appeal to their palates. Erm…. maybe the ingredients that go in making the Belgian Speculoos, without the sugar? Nope, don’t think so. Cinnamon and sugar go well. Cinnamon and salt? Nah!
Oh by the way, the addition of the natural yoghurt gave the Murukku just a bit of that tangy taste, which I actually liked. Tarla Dalal baked her chaklis for more than 30 mins which I thought was way too long. The Murukku came out perfect in my oven at just 15 to 16 mins baked on the pizza crisper and baking tray lined with silicone parchment sheet. I will definitely bake these again, on condition if I have a human helper in the kitchen to press the Murukku from the mould. That was the back-breaking and monotonous parts of the entire process, and the robotic Thermomix was no help at all (most unfortunately) *sigh*
The Dragon Boat Festival, also known as Duanwu Festival is a statutory holiday in China, Taiwan, Hong Kong and Tibet. It commemorates the life and death of the famous scholar and China’s first poet, Qu Yuan (Chiu Yuan). The festival falls on the fifth day of the fifth month (Double Fifth) on the Chinese lunar calendar. The Chinese calendar is lunisolar, hence, the date varies from year to year on the Gregorian calendar. This year, the festival falls on 9th June, 2016. Although it is not a public holiday in most parts of the world, most Chinese around the world celebrate the festival by preparing the most iconic food of the festival, the sticky rice dumpling. There’s no wonder the Dragon Boat Festival is also known as Dumpling Festival (Note: there’s a sad legend behind this Festival at the end of this post)
Journey of Love
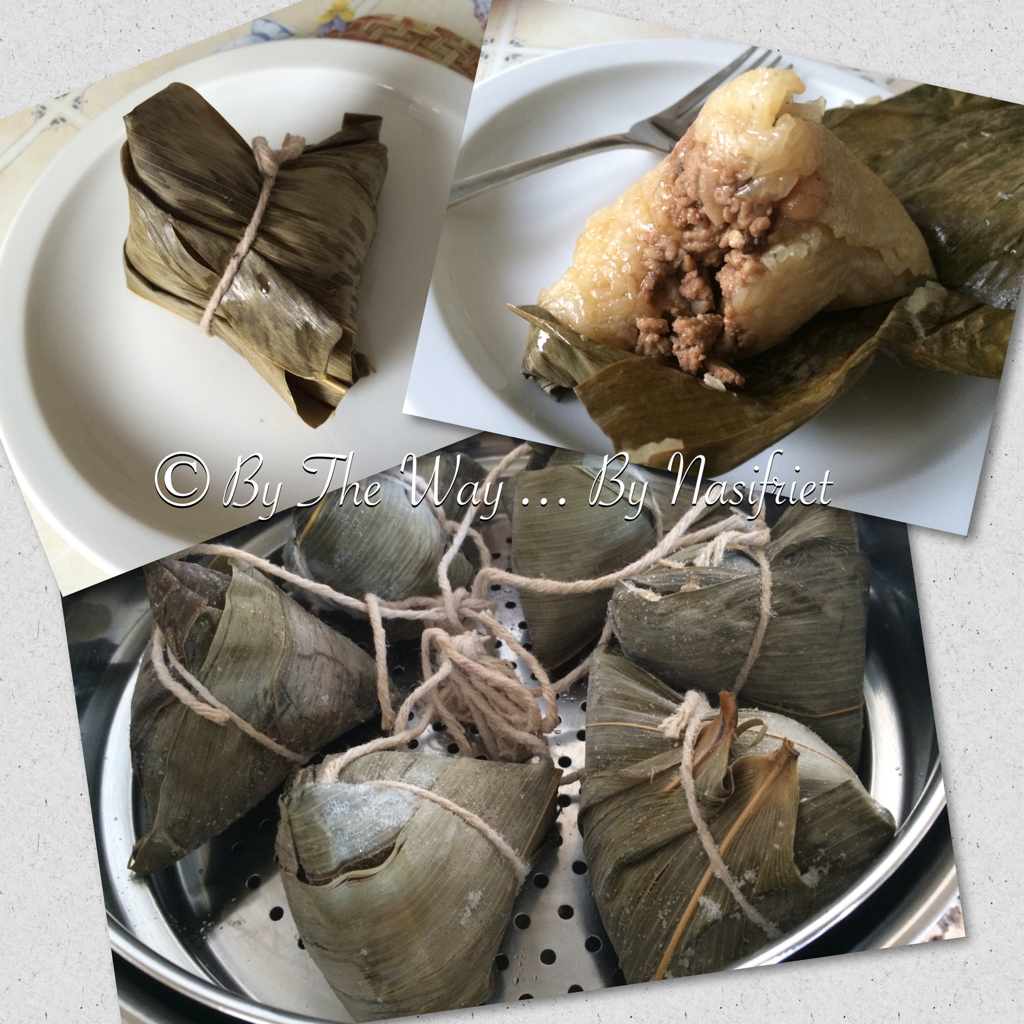
Making the sticky rice dumpling, or most popularly known as Bak Chang (meat dumpling) in the lingo I am familiar with, has always been at the back of my mind since time immemorial.
And since time immemorial, I have been drooling looking at photos of one of the dreamiest dumplings on my planet of food list.
I have been telling myself for years, “I must make these dumplings“… BUT… Zilch! To be honest, it’s not difficult to make Bak Chang, but the laborious cum tedious process was the stumbling block. IF only I had kitchen helpers …
When my Mum and big sis came to visit me two summers ago, I was thrilled. I told them that we could dedicate an entire day making my sought-after glutinous rice dumplings. No probs, promised Mum and sis 🙂
Labour of Love
There are many different varieties of Bak Chang ~ Teochew, Hokkien, Hakka, Taiwanese, Cantonese, Nyonya… gosh, I’m out of breath now … and the list goes on, still. Therefore, in my opinion, there is no one rigid way to making these dumplings. The filling for the dumpling varies, which can be customised to one’s preference. For instance, some people may like a bit of sweet in their savoury Bak Chang, using fatty pork belly instead of lean meator some colour in their glutinous rice (from white to blue tip to black … Hmmm…sounds like the belt grading systems of Taekwondo or perhaps Tang Soo Do or Jiu Jitsu? Lol!). Well, I am not fastidious about all that. I don’t care! Just give me the Bak Chang, please.
By the way, I was glad to observe Mum and big sis conjuring the magnificent Bak Chang live in my kitchen two summers ago *wink*
I showed them the ingredients for ourBak Chang. Both ladies nodded their heads, but Mum winced when she looked at the dried bamboo leaves. She was not use to using the flimsy-feel of the bamboo leaves. Mum used to wrap her Bak Chang with the sturdier and fragrant giant pandan leaves, which were in abundance in Sarawak and Kalimantan. Big sis had no issues with using the bamboo leaves because she had made Bak Chang in KL and Batu Pahat. Phew!
I captured the 2 sifus with the camera on my iPhone. While Mum chopped cloves after cloves of garlic and shallots, big sis did all the stir fries. Every single ingredient was treated individually and separately.
The dried bamboo leaves were soaked with several changes of water overnight. On the day of use, new water replaced the overnight water. Again, several changes of water took place until the water ran clear. Each leaf was dabbed dry with a towel. The cleaned bamboo leaves were then set aside until they were ready to be used.
The glutinous rice was washed and soaked for at least 2 hours. The shallots were fried first until crispy and were removed with a slotted spoon leaving the aromatic oil in the wok. Then my sis stir fried plenty of chopped garlic in the same oil until fragrant and she added the pre-soaked glutinous rice. The rice was seasoned with salt, chicken granules, freshly-milled white (Sarawak) peppercorns, light soy sauce, mushroom oyster sauce, freshly-ground dry-roasted coriander seeds and 5-spice powder, all to taste. She then quickly mixed and stir-fried the glutinous rice and added half of the crispy shallots. Note, the rice must not be completely cooked.
In another pan, my sis added some cooking oil and fried some chopped garlic until fragrant. She then added the minced pork and diced pre-soaked shiitake and seasoned with light soy sauce, dark soy sauce, mushroom oyster sauce, a little drizzle of sesame oil, freshly-ground coriander seeds, 5-spice powder, freshly-milled white pepper, salt and a dash of sugar, to taste. Finally, she added the remaining crispy fried shallots.
The dried shrimps were pre-soaked before they were quickly stir-fried. The peanuts were boiled. Then there were store-bought vacuum-packed cooked chestnuts and, yes… chickpeas, too! That’s the beauty of homemade rustic Bak Chang 😀
A Picture is worth a Thousand Words …
Thank you dearest Chefs for being the BEST kitchen helpers in the whole wide world. Love ya LOTS!
The journey of love continued with the boiling of the wrapped Bak Chang in a big pot of boiling water. A bit of salt was added to the water and a batch of Bak Chang was submerged in the boiled water. These Bak Chang were boiled for at least 3 hours and then hanged briefly to dry before consuming The End of a Gruelling Journey: The Moment of Truth … Tada!
Honestly speaking, it was beyond BombDiggity yummy inside AND out!
I wish to relive that journey of love on my own some day… Perhaps in my thermomix *wink*
Too bad, though, two years on, I’m still drooling at the photos of my Mum’s and sister’s glutinous rice meat dumplings! *blush*
Pinch!
Ouch!
Oh by the way, the Bak Chang froze brilliantly. You need to steam them for at least half an hour or more until they are warmed through.
It made excellent wholesome breakfast or a quick lunch, high-tea or dinner.
Mum and sis, thank you so much for taking my offer. You have succeeded in banishing my longstanding torments of craving for this thingie, here, in my very own kitchen! I’m sure you would have made the Bak Chang differently in your own kitchen, but with my simple and challenging bag of ingredients, we have managed to incorporate a bit of China in the tetrahedral-shaped glutinous rice savoury meat dumpling ~ Hakka (minced meat and boiled peanuts), Teochew (crispy fried shallots and 5-spice powder), Nyonya (ground coriander seeds), Hokkien (dark soy sauce and chestnuts). What more could I ask for 🙂
Making Bak Chang is by no means an easy chore. It entails a string of well-thought and structured process.
I salute to all of you out there in making this annual repertoire of one of the most arduous and relentless products seemingly easy looking.
A Sad Legend Has It …
(Adapted and modified from Beijing International “A Sad Story Of Qu Yuan” and the Wikipedia)
Have you ever wondered the connection between eating the glutinous rice dumpling with the Dragon Boat Festival? Well, I was one of the people who actually wondered about it, so I delved a bit further and read about the legend of the Chinese poet, Qu Yuan (or Chiu Yuan).
Qu Yuan was the number one advisor of the kingdom of Chu, however people were jealous of his position which also affected the King’s trust in him. The King unheeded his advice which resulted in the King’s death. The new King continued to enjoy the luxury life full of scandals and corruption. He thought Qu Yuan was a nuisance and a hindrance in his kingdom, so he was exiled. During that period, Qu Yuan wrote many patriotic poems.
One day, Qu Yuan met a fisherman, who never cared about the country and was quite satisfied with his life. The poet thought that the people only cared about themselves and not the future of the country. For the poet, it was meaningless to live, so he killed himself by drowning in the Miluo river. The fishermen tried to rescue him but the body was never found.
In order to keep fish and evil spirits away from his body, they beat drums and splashed the water with their paddles. They also threw rice into the water both as a food offering to Qu Yuan‘s spirit and also to distract the fish away from his body. However, the legend continues, that late one night, the spirit of Qu Yuan appeared before his friends and told them that he died because he had taken himself under the river. Then, he asked his friends to wrap their rice into three-cornered silk packages to ward off the dragon.
These packages became a traditional food known as zongzi (Bak Chang orglutinous rice dumpling). The lumps of rice are now wrapped in leaves instead of silk. The act of racing to search for his body in boats gradually became the cultural tradition of dragon boat racing, held on the anniversary of his death every year on the fifth day of the fifth month (equivalent to Thursday, 9th June, 2016 in the Gregorian calendar)