Cook Your Books · Cooking with Herbs · Own Recipe · Tea Time Treats · Vegetarian

Spiced Oven-Roasted Cauliflower Florets 

Cauliflower and broccoli are both cruciferous vegetables, with very similar nutritional properties and health benefits. They are both low in fat and high in dietary fiber, water and vitamin C. While traditionally, we tend to differentiate cauliflower as white and broccoli as green in colours, it has not been the case anymore. There are few variants of cauliflower with garish-looking colours of orange, green and purple!

Erm… I think I’ll stick to my white head for now 🙂


In Quest for the Best Method

As far as I could remember, my Mum seldom bought cauliflower when I was a kid, as the veg only appeared in the vegetable markets or supermarkets once a year during the Chinese New Year season. The only way I knew cauliflower was cooked then was in stir-fries (mixed veg) the Chinese way. It’s usually a good stir-fry but amazingly, all the other vegetables (broccoli, baby corn, straw or oyster mushrooms, sugar snap peas and carrot) would be gone in a jiffy leaving some white florets behind on the plate, untouched. Kids’re not very fond of the crunchy texture and odd flavour of the cauliflower. That’s what I remembered when I was a child.

Now that I’m not a kid anymore, I re-visted my Mum’s kitchen and cooked up a quick mixed veg stir fry dish for my family. It looked appetisingly good, but amazingly, I went through a déjà vu experience. All the other veg were gone in no time at all but not the poor cauliflower florets! What’s wong??!!

Honestly speaking, my guys LOVE cauliflower, but it was the wrong execution. So, exit, the quick stir-fry method…for the time being, of course 😉

There are several ways to prepare cauliflower ~ oven-roasted, baked, grilled, fried, steamed, boiled and blended in soup or eaten raw. Cauliflower soup with a touch of garam masala has been a winner with my family. So also steamed cauliflower in bechemel sauce. Raw cauliflower is great in dips or in tabbouleh salad, perfect for the summer season.

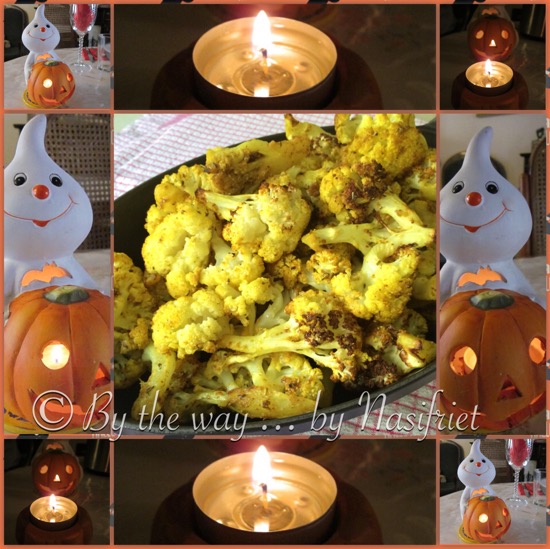
By the way, with the temperature plummeting of late, something warm is very much desired in my home. My all-time favourite method to appease everyones’ appetite unanimously is oven-roasted cauliflower florets. It’s the easiest and trust me, the tastiest way to prepare a mundane and almost boring looking cauliflower…. from just plain white to something cheerfully exciting!

Like so!


The warmth of the spices amalgamated in the cauliflower florets with the charred bits were a joy to eat. One whole head of cauliflower was easily gone in one serving for my family of 4! Not a single floret left untouched …


This recipe is inspired by Erin Gleeson’s, The Forest Feast Cookbook, with my variation of spices, dried herbs and roasting duration. 

Ingredients

  • 1 head cauliflower, cut in florets

Spice-Herb Mix

  • 1 tsp coriander powder
  • 1 tsp cumin powder
  • 1 tsp curry powder
  • 1/2 tsp turmeric powder
  • 1/2 Tbsp Herbes de Provence 
  • Freshly-milled black peppercorns 
  • Coarse sea salt, ground ~ to taste

4 Tbsp Olive Oil or any cooking oil


Method

  • Pre-heat the oven to 230 deg C
  • Mix the ground spice-herb mix  in a bowl and pour in a clean ziplock bag
  • Add the cauliflower florets in the bag of spice mix and shake the bag to coat the florets evenly
  • Place the spiced florets in a baking tray. Add cooking oil and stir to distribute the oil evenly over the spiced florets
  • Bake for 25 minutes
  • After 25 minutes, lower the temperature to 200 deg C and bake for a further 8 to 10 minutes.
  • Ready to serve


Bon appétit!

Cauliflower is typically an Autumn veg. For this, I’m linking this post to the following October blog-hop cooking events –

Lavender & Lovage’s Cooking with Herbs for Autumn 


October Tea Time Treats: Halloween and Bonfire Night Treats hosted by Lavender & Lovage and The Hedgecombers

 
Cook-Your-Books #27 @ Kitchen Flavours
   
Happy Mid-Week! 

Cheers

Cook Your Books · CookBlogShare · Cooking with Herbs · Vegetarian

One Brainy Cauliflower Head with Smooth, Glossy and Creamy Sauce

If there was one special dish that I first ate in Belgium, cooked by my late MIL which I will never forget was one whole cooked cauliflower head served neatly on a large platter decorated with young carrots and green peas. The cauliflower was then drizzled with a home-made white and silky-looking sauce. It’s simply picasso on a plate! Alas that was 2 decades ago! 

My MIL passed away in 2006. She was an amazing cook and she baked flawless cakes and breads, too. I have kept some of her recipes, preserved by her daughters, my Sisters-in-law. Every so often, when my late MIL was still alive, she wanted to teach me to bake breads the traditional way, without a bread machine. I regretted not having the opportunity to learn the tricks of the traits. Sigh! Due to time, work and distance from our place to my MIL’s, there was absolutely no way for me to inherit any of her kitchen tricks. I managed to get by, by following very concised instructions from hand-written recipes passed down to me by her daughters. Both my SILs are good cooks but not as great as their late Mum.

Brainy Garden

When I was a little girl, I have always associated the colour of vegetables being green, mainly because I grew up in Kuching where Mum used to buy her greens a lot – mustard greens, chai sim (vegetable heart), napa cabbage, snow pea, kangkong (water convulvulus), kai-lan (Chinese broccoli/ kale), Shanghai bok choy, okra (ladies’ finger), kacang botol (4-angled beans), long beans, Sarawak jungle ferns (Midin), paku (fiddlehead) and spinach. Coloured veg were luxury products and were bullish where pricetags were concerned as they were all imported – from China, New Zealand or Australia – such as carrot, cauliflower, pumpkin, leek, celery, fennel, paprika, tomato (which is technically a fruit, I know…) and what have you… 

The only way I was used to eating cauliflower was in small florets stir-fried with broccoli , carrots, baby corn, sugar snap peas, shiitake and cloud ear fungus. I have never seen cooked cauliflower served whole until I came to Belgium!

To me, a cauliflower head looks like a brain. The white curd reminds me of the lobes of the cerebral cortex. LOL! Incidentally, my other half and 2 boys love cauliflower. Last Sunday was Father’s Day. It was the second time we celebrated Father’s Day this month! Why? Because in Belgium, Father’s Day is celebrated on the second Sunday in June while most countries celebrated their Father’s Day on the third Sunday, including Malaysia.

Lucky hubby! He had 2 special meals two Sundays in a row! Last Sunday, I made one of his favourite Sunday meal vegetables, I called Brainy Garden. He used to tell me that each time I made the cauliflower dish, it transported him back to his childhood:-)I’m quite certain my late MIL would give her sign of approval *wink*

To Boil or to Steam?

My late MIL used to boil the cauliflower head to perfection. I have never found the correct timing on when the cauliflower was done using the ‘boil’ method. My cauliflower always turned out too under (hard) or too over-done (mushy)! So out goes the boiling method. I found steaming the whole cauliflower a lot easier, my Goldilock’s test of doneness *wink  You need –

  • 1 cauliflower, steamed for 35- 40 minutes
  • 400g green peas – I used frozen – sautéed in garlic butter

Due to the blandness of the cauliflower, a nice sauce or gravy drizzled on the brainy head could immediately titillate ones palate. I had no clue how my late MIL made her white sauce, hence, I found one of the best white sauce recipes, aka as Béchamel sauce fom Delia Smith’s Cookbook, “Delia’s How To Cook – Book One“. I have two of Delia’s “How To Cook” Cookbooks.

White sauce is made from a roux (butter and flour) and milk. I like the fact that Delia flavoured the milk with parsley stalks, onion, mace, whole black peppercorns and bay leaf. The infused milk is then added bit by bit to the roux to form a smooth, glossy and creamy sauce. The trick to getting to that stage is in the vigorous stirring and whisking of the sauce with a wooden spoon first and then a balloon whisk and back to a wooden spoon.  Patience is key, too!  I did not have mace, hence, I seasoned the sauce with freshly grated nutmeg, freshly milled back peppercorns and fleur de sel. Due to copyright, I have not listed down the measurements, but all the ingredients are mentioned.

To keep the sauce warm, Delia recommended pouring the sauce in a warmed jug and cover the surface with a clingfilm to stop a skin from forming. I then placed the jug in a saucepan big enough to hold in the jug and filled the pan with kettle-boiled water. Oh by the way, I have made other variations of white sauces in the past, with grated parmesan or with a sprinkle of curry powder or chilli powder or Dijon mustard. Brilliant!

Instead of using frozen peas, canned peas and carrots make great substitute, too.

Like so…


In this recipe, I’ve used parsley stalks and bay leaves, therefore, I’m linking this post to Lavender & Lovage’s “Wild Garlic and Chives” May and June’s Linky Party for Cooking with Herbs.
    

I’m also linking this post to #CookBlogShare 17 hosted by Supergolden Bakes


It has been a while since my last link up to Joyce’s blog-hop cooking challenge, hence I’m linking this post over at Cook-Your-Books #24 @ kitchen flavours 


Have a great, warm weekend!
Cheers! 


Belgian · Belgium · Books · Cake · Cook Your Books · Dessert · Homemade Mondays · Little Thumbs Up! · Sweet · Weekend Cooking

A Special Banana Bread based on the “Fountain of Youth” theory

At the of age of 17, he wrote his first Science book, “Schitterend!” (Brilliant!) about the Universe and the theory of Evolution. He was 18 and the youngest nominee for the Eureka. At age 21, he published his second book, “Fantastisch!” (Fantastic!) on Evolution and Neuroscience. Fantastic! was also nominated for the Eureka. By age 25, he became the author of 3 Science Books and had invented a new food model for his patients to slow down ageing and reduce the risk of ageing-related diseases. This achievement won him the title of ‘Person of the year‘ in his home country, Belgium.


Dr Kris Verburgh is the author of one of the most controversial books, “De Voedselzandloper” (The Food Hourglass), which is available in 9 languages.


As you can see on the coverpage of the book, the 2 triangles interlocking at the pointed tips are quick summaries of 2 pyramids (“hourglass”).  One pointing up with its hierarchical strata of foods which we should consume more of and the top half tapering downwards indicating foods we should eat less of. Not many University Professors are in agreement with Dr Verburgh’s theory. As a result, he had to resign from the University he graduated with magna cum laude.


I did not buy Dr Kris Verburgh’s “Science” book, but I bought “De Voedselzandloperkookboek” (The Hourglass Cookbook), authored by Pauline Weuring based on the young doctor’s scientific theory of nutrition in slowing down the signs of ageing through what we eat, and losing weight in the process.


By the way, there is a catch. According to Dr Verburgh, he says, diets do not work and what does is educating oneself about what to eat with knowledge that is readily available. What we eat determines how fast we age. Basically, discovering thefountain of youth‘ is to avoid the typical diseases of ageing, which is anything from loss of eyesight to heart disease, type II diabetes, cancer or osteoporosis. 


Quotes from Kris Verburgh, MD


If you want to have the health benefits of healthy food, you have to do it your whole life. Not just for a period of time, but always


We can add more than 10 years to our lives if we know what foods to eat and which ones to avoid. That would keep us healthy well into our eighties


Ageing is a very complex process. We know that the rate of ageing is influenced by our genes and our environment and more specifically by how and what we eat. Powerful interventions that slow down the ageing process will come to see light in the coming decades. For now, the most potent tool at our disposal to impact the rate of ageing is our diet“.


Cakes and sweets should be replaced by dark chocolate and nuts


The Food Hourglass will show you how to immediately identify what is healthy and unhealthy food, and how to replace unhealthy foods with alternatives“.


Fountain of Youth


When I flipped through the pages of The Hourglass Cookbook, I saw a cake recipe!!! What’s a cake doing there? I exclaimed!


But then I realised it’s not an ordinary cake. It’s a cake recipe based on Dr Verburgh’s “fountain of youth” theory. Very interesting indeed.  No sugar. No flour. No butter. No milk.  Erm…how to make a cake without all the basic essentials?  Well, of course, the young doctor has the answer and the result? 


This! 


I made this healthy Banana Bread or Cake and was surprised at how moist and delicious the cake remained on the day of baking and subsequently. Anyway, the cake was gone in less than 48 hours! It was really light. I have made the cake twice already and was very pleased with the result both times.


Due to copyright, I am not listing the measurements of the cake. If you really want the recipe, leave your comment with a valid email address and I will get back to you personally or for readers who know me, please pm me😉


The ingredients used in the recipe are as following –

  • Bananas
  • Dates
  • Eggs
  • Almond meal or flour *
  • Baking soda
  • A pinch of Salt

Method

  1. Pre-heat the oven
  2. Combine the mashed bananas and dates in a bowl
  3. Beat the eggs with salt until light and fluffy 
  4. Fold in the almond meal or flour and baking soda
  5. Grease the cake tin with some baking spray
  6. Pour in the batter and bake in the pre-heated oven
  7. The banana bread is cooked when a toothpick pricked in the middle of the cake comes out clean
  8. Cool the cake on a cooling rack before cutting

*Almond meal or flour is a result of ground almond nuts (with or without skins respectively) which is the healthier option to a normal cake flour


Note: For more variations, you may want to add pure chocolate chips or chopped pecan nuts


Obviously the sweet taste from the cake came from the bananas and dates.  Very natural and healthy options, indeed. 


Oh by the way, I think I’m feeling young already.  Yay! Ha ha…!


According to Wikipedia, a popular Flemish TV chef said his diabetes is stabilized due to the Food Hourglass theory and he claims to have lost almost 8 kg (17 pounds) as a result.


Honestly, I am fascinated by the theory, but I have some issues. I do love a good steak with fries, an oven-baked pizza, a bowl of spagbol with lots of grated mozzarella, cupcakes/ muffins, cakes (chiffon, pound, Sarawak kek lapis), and the “bad” list goes on….


Oops! There goes my fountain of youth! LOL!


BUT… I will not stop baking this light and gorgeous Banana Bread.


I’m linking this post to the Little Thumbs Up (March 2015 – BANANA) event organised by Zoe (Bake for Happy Kids)and Mui (my little favourite DIY) and hosted by Faeez of BitterSweetSpicy.


Homemade Mondays week 123 hosted by Sarah of Frugal by Choice, Cheap by NecessityAubrey of Homegrown & Healthy and Kelly from The Sustainable Couple 

Beth Fish Read’s Weekend Cooking


Cook-Your-Books #21 @ Kitchen Flavours 


Tasty Tuesdays with HonestMum


Have a great week!

Cheers!

Belgian · Belgium · Cook and Celebrate · Cook Your Books · Cooking with Herbs · Main Course · My Treasured Recipes · Poultry · Savoury · Slow Cooked Challenge · Weekend Cooking · Western

Slow-Cooked Turkey Stew with Speculoos and Abbey Beer #Slow-Cooker

6th December is the feast day of Saint Nicholas. In Flanders (Belgium) and the Netherlands, Saint Nicholas is called Sinterklaas. In Belgium, children up to 12 years of age receive their gifts in the morning of 6th December, while kids in the Netherlands get their gifts from the De Goede Sint (The Good Saint) the night before (5th December), on condition that they have been good all year. It is believed that The Good Saint keeps record of the good and naughty behaviours of the children.

Does he not sound familiar to us? 😉

Yup, you better watch out, you better not cry, you better not pout, I’m telling you why… but hey no… it’s not Santa Claus, but Sinterklaas came to town! 

By the way, the name Santa Claus is derived from the older Dutch name Sinte Klaas, because Saint Nicholas is the patron Saint of children.

Santa Claus is also known in both Belgium and the Netherlands, but he is known as Kerstman or Christmas man, ie not a Saint but just a good and jolly fat man who brings lots and lots of presents to kids all over the world on Christmas Day.

Here’s an animated version when Sinterklaas (the Saint) meets Santa Claus (the jolly fat man)

IMG_9081-0.JPG 

Oh by the way, I have been good all year, too … because Sinterklaas visited us at work!

Yesterday morning, I received the following message in my inbox ….

Dear colleague,

Last night Saint Nicholas secretly visited our HUB. He has brought some candies for you because you have been good.

Enjoy!

IMG_9085.JPG

Here’s what I got from De Goede Sint 😊

IMG_9083.JPG
A must-have gift from Sinterklaas is a type of gingerbread biscuit, called Speculoos, or is it Speculaas? Lekker

So is it Speculoos or Speculaas?

According to Google translator, Speculaas is Dutch for Gingerbread. Incidentally, Speculoos is detected as a French word and is used by Wikipedia as the source word to define “Speculoos” in English. The definition of Speculoos by Wikepedia differs to the “arguments” between the Flemish-speaking Belgium and the Dutch from the Netherlands. 

 Speculoos or Speculaas – both terms are correct, but it’s the ingredients that went in the product that made the difference. The Dutch – as we all know with the history of the Spice Trade in Asia between the 15th and 17th centuries – battled a bloody conflict with Spain and England to gain control of the spice trade after the Portuguese. Erm…. who do you think won? Well, the winner is judged by the usage and consumption of spices in today’s kitchen, of course! 😉

I daresay the Dutch are more daring with their spices than the Belgians. The Dutch named their gingerbread, Speculaas, which includes the following spices: cinnamon, cloves, coriander, cardamom, ginger, nutmeg and white pepper. On the other hand, the “shy-er” Belgians with their less daring palates can only take the cinnamon and a bit of ginger and caramalized sugar to form the crunchy biscuits they called, Speculoos. And there you have it, the difference between Speculoos and Speculaas

Stewed meat or stoofvlees is very popular or perhaps even the signature dish of Belgium. A classic Belgian meat stew is often cooked slowly over medium-low fire with a good glug of Belgian beer. I have cooked Flemish beef stew many times which I learnt from my late MIL. Over the years I have experimented cooking the dish by using different types of beer, which has got to be Belgian, of course😄 

Did you know that beers have colour? The colour is controlled by the malt that is used to brew it. Beer in Belgium varies from pale lager to lambic beer and Flemish red while generally beers are categorised as follows: White, blonde, amber, brown and black. The darker the colour, the bitter the taste. 

I have always used cubed beef stew meat, however, this time, I chose to use cubed Turkey meat by adding two very Belgian ingredients – speculoos and Maredsous 6 Blonde, an abbey beer. The number 6 represents the level of alcohol content, ie 6 %.

IMG_9062.JPG

Ingredients
(Adapted and improvised from a Colruyt recipe catalogue entitled Pork stew in Floreffe beer with my own method of preparation) 

• 1 kg pork stew (I used 2 kg cubed Turkey stew) 

• Onions, chopped (I used 4)
• Butter (to brown the meat) 

• Gingerbread cookies (I used 9 Speculoos cookies) 

• 1 Tbsp mustard (I used 2) 

• 1 Tbsp honey 

• 2 Tbsp flour or just enough to thicken the sauce 

• 33 cl Floreffe Blonde (I used 2 x 33cl Maredsous 6 Blonde) 

• 1 Tbsp vinegar (to taste) 

• Cloves (I used 6 cloves) 

• Thyme (I used a few sprigs of fresh thyme) 

• Bay leaf (I used 2) 

• Salt and pepper to taste

IMG_9061.JPG

Method (own)
1. Melt some butter to lightly brown the turkey meat. Sprinkle the flour and stir well.

IMG_9063.JPG
2. Add the chopped onions, cloves, mustard and honey.

IMG_9064.JPG
3. Crumble the Speculoos cookies. Stir well to combine the ingredients before pouring the beer along the edge of the stew. Throw in the fresh thyme sprigs and bay leaves. Season with salt and pepper to taste. Stir well.

IMG_9065.JPG
4. Transfer the stew to the Slow Cooker. Switch the button to high for 1 hour and then to low for 2 hours. Thirty minutes before serving add the vinegar. You will know when the stew is ready when the sauce is no longer runny and the beer has completely evaporated and the sauce has slightly thickened. And the aroma! So Christmassy with the sweet smell of the spices whiffing passed my nostrils😜

IMG_9066.JPG
Note: To have even a richer tasting stew, let it cool before storing in the fridge until the next day. Heat the stew on auto for 45 minutes to 1 hour before serving. Add more vinegar if necessary.

Smakelijk!

IMG_9070.JPG

IMG_9067.JPG

IMG_9068.JPG

December may have 31 days, but to me, it’s the “shortest” month of the year due to the year end rush. And before we realised, it’s the New Year… Arghh!!!

Christmas is a time for giving and sharing. With Christmas in less than 3 weeks from now, I would like to share this recipe to the following Christmas themed blog-hop cooking challenges –

Janice Pattie’s Farmersgirl Kitchen’s December theme: Slow-Cooked Christmas

IMG_9102.JPG 

Lavender and Lovage’s “Sugar & Spice (November and December Cooking with Herbs Challenge)”

IMG_8719.PNG 

My Treasured Recipes #4 – Ho Ho Ho It’s Christmas (Dec 2014) hosted by Miss B of Everybody Eats Well in Flanders and co-hosted by Charmaine of Mimi Bakery House

Cook and Celebrate: Christmas 2014 hosted by Yen from Eat your heart out, Diana from Domestic Goddess Wannabe and Zoe from Bake for Happy Kids

IMG_9100.JPG

Bangers & Mash’s December’s Spice Trail Cooking with All-spice (WITHDRAWN. For more information, see N.B)

IMG_8714.JPG 

Beth Fish Read’s Weekend Cooking

IMG_8715.JPG 

Cook-Your-Books #19 hosted by Joyce of Kitchen Flavours

IMG_8718.JPG


Happy St Nicholas’ Day! Hope you have been good😄 

Cheers! 

N.B. I would like to apologise to Vanesther of Bangers & Mash for incorrectly linking this post to her December’s Spice Trail – cooking with Allspice. I had mistaken allspice to mixed spice (cinnamon, cloves and nutmeg). Allspice is a spice in its own right, completely different than mixed spice, which I must admit I did not use in this recipe. I have withdrawn my submission of this post to The Spice Trail Challenge for the month of December. Thanks, Vanesther, for pointing that out.

Bake Along · Baked Bread/ Bun/ Puff · Brazilian · Cook Your Books · Savoury · Snack · Weekend Cooking

Pão de Queijo (Cheese Bread / Brazilian Cheese Popovers)

If you happened to be reading this post and were wondering, “Where’s the bread? That does not look like bread”, then you are on the right post 😉

1. Pao de Queijo_closed up_basket

Pão de Queijo is cheese bread in Portuguese!

At first I thought pão is bun, as is used in Hokkien (pao = bun), however, ‘boa’ is bun in Portuguese.

When I first discovered that pão de queijo is cheese-flavoured bread, the word queijo kept replaying in my head like an old, broken gramophone.

Okey doke, the penny dropped! I realised where I have heard the word queijo from. It’s a word that I came across when I was in school in Kuching (Sarawak). In the Malay language, ‘keju’ is cheese.

Oh by the way, the Malay language has many loanwords, one of which is Portuguese, and one of which is queijo = keju = cheese.

A Truly Brazilian July

Honestly speaking, July 2014 had been a very sportive month, with many back-to-back international competitions, such as the Le Tour de France, Gand Slam (tennis) in Wimbledon on grass, XX Commonwealth Games in Glasgow, and last but not least – and probably – themost prominent of all Tournaments was the 20th FIFA World Cup hosted by Brazil.

Although the host country did not win the World Cup this year, Brazil has won the hearts of millions of people with her much acclaimed cheesy bread.

Pão de Queijo had been flying around the net like nobody’s business this summer.

Ooh! Wow! Yum!

Yup, I exclaimed those words in that sequence – really, and, not wanting to be left gawking at the photos for nothing, I joined in the crowd.

The following proverb tells a lot about me. “Give a man a fish, and you feed him for a day; show him how to catch fish, and you feed him for a lifetime.”Unknown

2. Pao de Queijo_closed up_basket3
Mine! Mine! Mine! (remember the seagulls in Finding Nemo?) LOL!

Addictively Cheesy!

Yes, Addictively Cheesy!

Pop one in your mouth and you will be popping in chain reaction. Ha ha ha..

Pão de Queijo is crunchy dough snack with a mild cheese flavour. These little gems are eaten throughout Brazil, at breakfast or as a snack. I think the secret behind this addictive delicacy is the crispy outer layer while the inside is almost hollow and chewy and moist.

3. Pao de Queijo_cheezy

Yum!

The essential ingredients used in making Pão de Queijo are very similar to making Popovers – eggs, milk, flour, oil or melted butter and salt. The only glaring differences are the use of cassava flour (or tapioca starch) and cheese(s), hence, living up to its name.

I noticed there are 2 ways of preparing these cheesy bread (1) the all-in –one method with the cold milk-oil-flour-salt-egg-cheese mixture pouring in the cavity of each muffin tin or pan or (2) the boiled milk-oil-salt mixture amalgamating in the flour followed by beaten eggs and cheese.

I have tried the first method first. Personally, I prefer the second method because it’s the authentic and traditional way of preparing Pão de Queijo.

Here’s one I made earlier using the first method, very similar to making popovers or Yorkshire puddings. Oops…not the best photography 😦

4. Pao de Queijo_cold process_r

In this post, however, I have based my recipe on a cool looking Cookbook, in the Dutch version, “BRASIL! Het Kookboek” (BRAZIL! The Cookbook) by David Ponte, Lizzy Barber and Jamie Barber. Note I have made some variations with my comments in blue italic.

5. Pao de Queijo_Cookbook_r

Ingredients –

  • 1.25 dl full cream milk
  • 50 ml Sunflower oil (I used Corn oil)
  • 1 tsp sea salt (or to taste)
  • 250 gm cassava flour (or tapioca starch/flour)
  • 2 eggs, lightly beaten (I used 2 small eggs)
  • 200 gm Parmesan or cheddar, grated (I used 100g grated Parmigiano Reggiano plus 150g Mozarella)

Method –

  • Pour 1.25 dl milk, Sunflower oil and salt in a large saucepan and bring the mixture to a boil. Remove the pan from the heat once the mixture starts to rise and bubble. Add the flour and quickly stir the mixture vigorously until there is no trace of dry tapioca flour. Stir to form moist dough. Transfer the dough to the bowl of a standing mixer fitted with a paddle attachment. Let the dough cool slightly.
  • Add the eggs to the cooled dough and mix them through at low speed. Increase the speed after 1-2 minutes and blend the mixture on high speed until all the egg is incorporated and the dough is smooth. Add the grated Parmesan (Parmigiano reggiano and Mozarella) and continue mixing until the cheese is incorporated in the dough mixture. 6. Pao de Queijo_kneaded dough
  • Line a baking sheet or parchment paper. Moisten the palms of your hands with water or oil. Take a tablespoon of dough and roll into balls. Wash your hands in between before shaping the balls, because the dough is very sticky. (You can also use a small ice cream scoop. Dip the scoop into ice water and shake off excess water before shaping the balls). Place the balls 2.5 cm apart on the baking sheet.
  • Preheat the oven to 200 degrees Celsius. Bake for 20-25 minutes until golden brown. They should be crispy on the outside and a little gooey inside. Serve immediately.

7. Pao de Queijo_in the oven_r

Depending on your oven and the size of the cheese balls, the result can go either way – too golden or too pale. Below the outcome of the baking times at 25 mins (top half) and 22 mins (below half).

8. Pao de Queijo_25 vs 22

I must admit that the ones baked for 25 minutes were crunchier with small pockets of air within the dough. They were less gooey than the ones baked for 22 minutes. The verdict? I loved both, because they’re Mine! Mine! Mine!   Ha ha ha…

9. Pao de Queijo_25 mins10. Pao de Queijo_22mins

11. Pao de Queijo_closed up_basket212. Pao de Queijo_jar2

I am sharing this recipe to the following blog-hop events –

Cook-Your-Books#16hosted by Joyce from Kitchen Flavours

Cook Your Books

Bake Along with the theme “Popovers”, hosted by Zoe from Bake for Happy Kids, Lena from Her Frozen Wings and Joyce from Kitchen Flavours

Bake Along

Weekend Cooking hosted by Beth Fish Reads

Weekend Cooking

Cheers!